Author: Tony Vattathil, Senior Cloud Engineer and Khalid Rahi, Associate System Engineer
Source: Planet OpenStack
![]()
This blog describes how to work with OpenStack networking on Ravello Systems, which enables OpenStack lab environments in the cloud. When configuring networks in an OpenStack environment on Ravello, you are essentially setting up nested KVM and overlay networks. Ravello’s nested virtualization technology abstracts the underlying the AWS and Google Cloud networking and presents a clean Layer 2 network. So, the OpenStack environment that’s running in Ravello utilizes this overlay network and configures its own overlay using the neutron networking service (did we say Inception!!!). I will use a pre-configured blueprint to describe how to setup OpenStack networking in Ravello. You can download this blueprint from Ravello Repo.
Start by launching the blueprint, then use ssh to connect to your instance (use the keypair provided by Ravello). Follow the instructions below to create neutron networks, public and private subnets, use neutron router to route traffic between subnets.
Tuning network interfaces in an OpenStack environment on Ravello Systems
In our configuration we used VXLAN as our tunneling protocol. There are some things to consider when nesting overlay networks. An overlay network is basically a network that is layered on top of an existing network. When using VXLAN, headers are added to all packets sent by your instances. This information is stripped off by the time the packets reaches its destination. Since the network is software defined, it allows flexibility and rapid deployment of custom network configurations. However, the added overhead can cause fragmentation with can manifests as poor network performance. Due to the additional information added to packets the overall size will be bigger than the default max transfer unit of MTU. To compensate we can make the MTU at the instance level smaller. On the neturon-server adjust the default interface MTU setting to 1300 instead of 1500. As a result, this will significantly reduce fragmentation resulting in better performance.
Execute the following command to set the instance MTU to 1200
echo "dhcp-option-force=26,1300" >/etc/neutron/dnsmasq-neutron.conf
Note: The type of application driving network traffic must also be taken in consideration while tuning. What type of data are you working with (Steaming large files/OLTP/Small files). For production workloads I suggest more specific tuning of the MTU. Modify and measure to see what setting works best best.
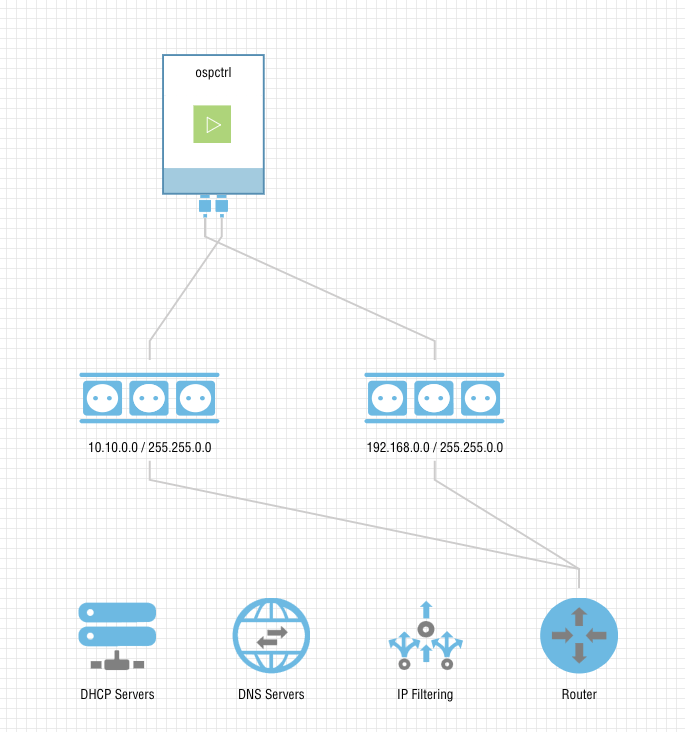
Physical Layer (Overview)
Public Network 192.168.0.0/16
Tenant Network 10.10.0.0/16
Working with Neutron
Start by change directory to root’s home directory.
cd /root
Next, restarting all OpenStack services.
openstack-service restart
Now authenticate as keystone admin.
source keystonerc_admin
Note: Your prompt will change to show that you have sourced the keystone admin credentials
Delete all demo networks
Before we can start creating our network, we need to make sure that all demo networks are removed. We start by deleting the existing ports.
neutron port-list | awk -F"|" '{print $2}'| grep -v id | grep -v "^$" | while read PORT; do neutron port-delete $PORT; done
Next we clear the default router.
neutron router-gateway-clear router1
After the default router has been cleared, we then remove the private interface from the router.
neutron router-port-list router1 | awk -F"|" '{print $2}'| grep -v id | grep -v "^$" | while read PORT; do neutron router-interface-delete router1;neutron subnet-list |grep private_subnet | awk -F'| ' '{print $2}' done
Next we can delete the default router.
neutron router-delete router1
Now we delete the public network.
neutron net-delete public
Next we delete the private network.
neutron net-delete private
Before moving on to the next step, we should verify that all network components have been successfully deleted.
neutron net-list
Note: This command should return an empty list.
Create all three networks (public, private and associated subnets)
As we proceed with the network build-out, you can see how the neutron network comes together piece by piece.
We start by creating our public network.
neutron net-create public --shared --router:external
Below is an example of the object that will be created in the OpenStack UI as a result of the command above.

Next, we create our public subnet.
neutron subnet-create public 192.168.0.100/24 --name public-subnet --disable-dhcp --allocation-pool start=192.168.0.100,end=192.168.0.253 --gateway 192.168.0.2
Below is an example of the object that will be created in the OpenStack UI as a result of the command above.

Now we create our private network.
neutron net-create private --shared
Below is an example of the object that will be created in the OpenStack UI as a result of the command above.

Next, we create our private subnet.
neutron subnet-create private 10.10.0.100/16 --name private-subnet --dns-nameserver 8.8.8.8
Below is an example of the object that will be created in the OpenStack UI as a result of the command above.

Now we create a router.
neutron router-create router
Below is an example of the object that will be created in the OpenStack UI as a result of the command above.

Next, we add the network interfaces to our private subnet.
neutron router-interface-add router private-subnet
Below is an example of the object that will be created in the OpenStack UI as a result of the command above.

Now we attach the router’s gateway to the public network.
neutron router-gateway-set router public
Below is an example of the object that will be created in the OpenStack UI as a result of the command above.

NOTE: After you set the router gateway, it disconnects you and you have to reconnect to node.
Since you were disconnected previously, you need to re-authenticate as keystone admin.
source keystonerc_admin
Lastly, we modify the default security-groups to allow SSH and ICMP.
neutron security-group-list | grep default | awk '{print $2}' | while read SEC ; do neutron security-group-rule-create --protocol icmp --direction ingress $SEC; neutron security-group-rule-create --protocol tcp --port-range-min 22 --port-range-max 22 $SEC; done
In summary
If you would like to run through this procedure, you can launch the OpenStack Liberty Neutron Blueprint in the Ravello Repo and run through this configurations yourself. Enjoy!
The post How to configure neutron networking in your OpenStack lab (Liberty) appeared first on The Ravello Blog.
Powered by WPeMatico