Author: enriquetaso
Source: Planet OpenStack
After cloning the DevStack repository and read the developer’s guide. I realized that nothing should be installed manually, or unless for beginners developers as myself. I know what you think “the guide tell me to clone my project repository manually” (here), but this isn’t the good way to do it. Use stack.sh.
How stack.sh works?
- Installs Ceph (client and server) packages installed
- Creates a Ceph cluster for use with openstack services
- Configures Ceph as the storage backend for Cinder, Cinder Backup, Nova, Manila (not by default), and Glance services
- (Optionally) Sets up & configures Rados gateway (aka rgw or radosgw) as a Swift endpoint with Keystone integration
- Supports Ceph cluster running local or remote to openstack services
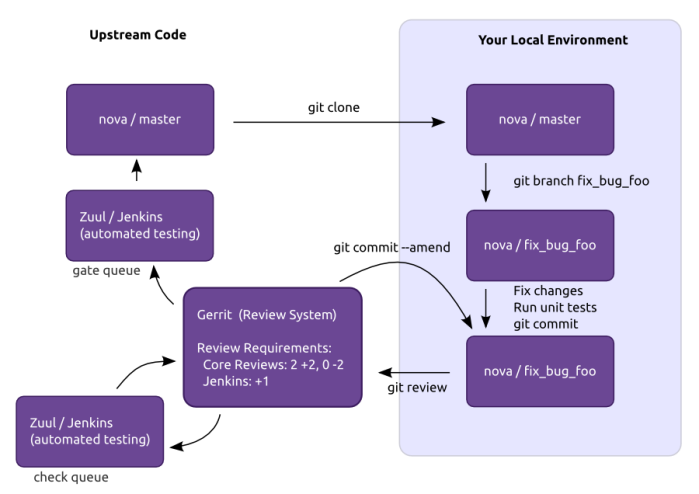
<figure class=”wp-caption alignnone” data-shortcode=”caption” id=”attachment_56″ style=”width: 900px”> <figcaption class=”wp-caption-text”>dev dynamic</figcaption></figure>
Devstack plugin to configure Ceph as the storage backend for openstack services
First, just enable the plugin in your local.conf:
enable_plugin devstack-plugin-ceph git://git.openstack.org/openstack/devstack-plugin-cephExample of my local.conf:
[[local|localrc]]
#######
# MISC #
########
ADMIN_PASSWORD=pass
DATABASE_PASSWORD=$ADMIN_PASSWORD
RABBIT_PASSWORD=$ADMIN_PASSWORD
SERVICE_PASSWORD=$ADMIN_PASSWORD
#SERVICE_TOKEN = <this is generated after running stack.sh>

# Reclone each time
#RECLONE=yes

# Enable Logging
LOGFILE=/opt/stack/logs/stack.sh.log
VERBOSE=True
LOG_COLOR=True
SCREEN_LOGDIR=/opt/stack/logs
#################
# PRE-REQUISITE #
#################
ENABLED_SERVICES=rabbit,mysql,key
#########
## CEPH #
#########
enable_plugin devstack-plugin-ceph https://github.com/openstack/devstack-plugin-ceph

# DevStack will create a loop-back disk formatted as XFS to store the
# Ceph data.
CEPH_LOOPBACK_DISK_SIZE=10G

# Ceph cluster fsid
CEPH_FSID=$(uuidgen)

# Glance pool, pgs and user
GLANCE_CEPH_USER=glance
GLANCE_CEPH_POOL=images
GLANCE_CEPH_POOL_PG=8
GLANCE_CEPH_POOL_PGP=8

# Nova pool and pgs
NOVA_CEPH_POOL=vms
NOVA_CEPH_POOL_PG=8
NOVA_CEPH_POOL_PGP=8

# Cinder pool, pgs and user
CINDER_CEPH_POOL=volumes
CINDER_CEPH_POOL_PG=8
CINDER_CEPH_POOL_PGP=8
CINDER_CEPH_USER=cinder
CINDER_CEPH_UUID=$(uuidgen)

# Cinder backup pool, pgs and user
CINDER_BAK_CEPH_POOL=backup
CINDER_BAK_CEPH_POOL_PG=8
CINDER_BAKCEPH_POOL_PGP=8
CINDER_BAK_CEPH_USER=cinder-bak

# How many replicas are to be configured for your Ceph cluster
CEPH_REPLICAS=${CEPH_REPLICAS:-1}

# Connect DevStack to an existing Ceph cluster
REMOTE_CEPH=False
REMOTE_CEPH_ADMIN_KEY_PATH=/etc/ceph/ceph.client.admin.keyring

###########################
## GLANCE - IMAGE SERVICE #
###########################
ENABLED_SERVICES+=,g-api,g-reg

##################################
## CINDER - BLOCK DEVICE SERVICE #
##################################
ENABLED_SERVICES+=,cinder,c-api,c-vol,c-sch,c-bak
CINDER_DRIVER=ceph
CINDER_ENABLED_BACKENDS=ceph

###########################
## NOVA - COMPUTE SERVICE #
###########################
#ENABLED_SERVICES+=,n-api,n-crt,n-cpu,n-cond,n-sch,n-net
#EFAULT_INSTANCE_TYPE=m1.micro

#Enable Tempest
ENABLED_SERVICES+=tempest' inside 'local.config
And finally, run in your terminal:
~/devstack$ ./stack.sh…and Boom! wait for the magic to happen!
Pictures from OpenStack
Please check out:
Powered by WPeMatico