Author: Nooruddin Abbas
Source: Planet OpenStack
The OpenStack platform, specifically Neutron (the networking component), uses the concepts of “ports” in order to connect the various cloud instances to different networks and the corresponding virtual networking devices like Neutron routers, firewalls etc.
The default security on these ports is quite restrictive (and rightly so) since the platform is supposed to be an autonomous, mostly independent system hosting multiple cloud tenants (customers) or different cloud instances with varying security requirements. To get a better feel on ports, take a look at the diagram below.
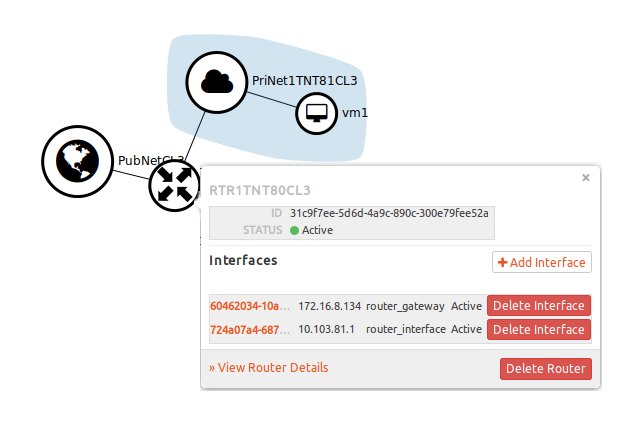
What you see above is a simple network topology in OpenStack. It is comprised of one Router (RTR1TNT80CL3) connected to two networks (PubNetCL3, PriNetTNT81CL3) and one VM (vm1). In the pop-up, you can see two IP addresses (172.16.8.134, 10.103.81.1) assigned to two interfaces on the router. These are two ports connecting the router to the two networks.
In certain advanced use cases (as you will see below) we might need to change the restrictive security settings on ports to allow for further customization of the environment.
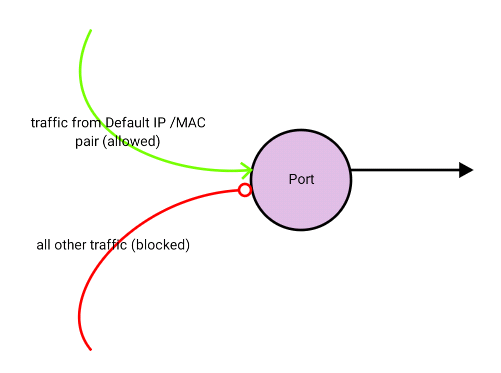
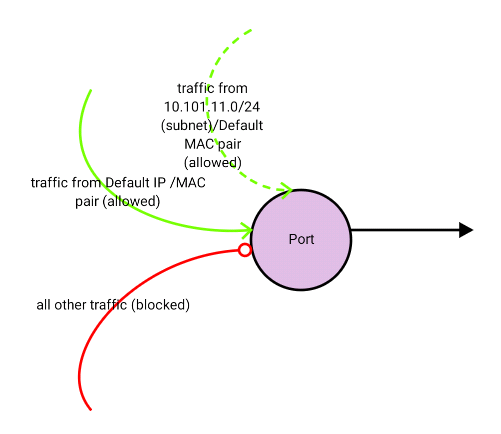
Thankfully, OpenStack allows us to manage security on the individual port level in an environment. By default, the following rules apply:
- All incoming and outgoing traffic is blocked for ports connected to virtual machine instances. (Unless a ‘Security Group’ has been applied.)
- Only traffic originating from the IP / MAC address pair known to OpenStack for a particular port, will be allowed on the network.
- Pass through and promiscuous mode will be blocked.
Allowing additional addresses
In certain instances, we would need to allow traffic from multiple IP address/MAC pairs to pass through a port, or for multiple ports to share a MAC address or IP address. One such requirement would be for clustering instances. In order to do this we need to add these IP address / MAC pairs on the port.
Step 1 – In order to obtain a list of all ports run the following command:
$ neutron port-list
+--------------------------------------+------+-------------------+-------------------------------------------------------------------------------------+
| id                                   | name | mac_address       | fixed_ips
+--------------------------------------+------+-------------------+-------------------------------------------------------------------------------------+
| 0240a7c8-f892-4596-8420-af5e3295a535 |      | fa:16:3e:3f:dc:18 | {"subnet_id": "8071b06a-bd05-49da-a710-ec85c8df5efb", "ip_address": "10.101.13.25"} |
| 064e8473-9bd6-4225-9cf3-13f855cd805f |      | fa:16:3e:2c:75:42 | {"subnet_id": "8071b06a-bd05-49da-a710-ec85c8df5efb", "ip_address": "10.101.13.6"}  |
| 0c86a8c6-c415-41be-958d-867ae110b995 |      | fa:16:3e:cb:cc:a3 | {"subnet_id": "3608806e-0991-4c81-91a5-11f9f097be64", "ip_address": "172.16.6.133"} |
| 0cb383b8-dadd-4b89-b863-d595a2173685 |      | fa:16:3e:7f:4a:78 | {"subnet_id": "8071b06a-bd05-49da-a710-ec85c8df5efb", "ip_address": "10.101.13.5"}  |
The above output list all the ports in the environment. The first column gives the port ID (e.g. “0240a7c8-f892-4596-8420-af5e3295a535”) and the last column provides the IP address (e.g. “10.101.13.25.”). The IP address is usually a good way of identifying the port.
Step 2 – Once you have identified the port, use the following command to list the port details:
# neutron port-show ee976fc9-882d-46d4-80ef-c352090b8089
+-----------------------+---------------------------------
| Field                 | Value
+-----------------------+---------------------------------
| admin_state_up        | True
| allowed_address_pairs |
| binding:host_id       | v1net1.lab.gbmcloud.int
| binding:profile       | {}
| binding:vif_details   | {"port_filter": true, "ovs_hybri
| binding:vif_type      | ovs
| binding:vnic_type     | normal
| device_id             | dhcpdab444c7-710d-580a-b097-950c
| device_owner          | network:dhcp
| dns_assignment        | {"hostname": "host-10-101-12-2",
| dns_name              |
| extra_dhcp_opts       |
| fixed_ips             | {"subnet_id": "9bce8971-2e28-40b
| id                    | ee976fc9-882d-46d4-80ef-c352090b
| mac_address           | fa:16:3e:56:35:c4
| name                  |
| network_id            | fc2a69df-cf8c-45ac-8c0f-2dd8911a
| port_security_enabled | True
| security_groups       |
| status                | ACTIVE
| tenant_id             | b56cc570621243ca8fd9d53056279238
+-----------------------+---------------------------------
The above output gives you the details of the port. Note that ee976fc9-882d-46d4-80ef-c352090b8089 is the ID of the port you are interested in. The first attribute that we are interested in is “allowed_address_pairs”. This is blank for now, meaning it will only allow traffic for the IP/MAC pair that is already assigned to the port by Neutron.
In order to allow more than one IP/MAC pair to pass through a particular port, you would need to add the additional IPs to “allowed_address_pairs”. Use the following commands to manage this attribute:
Step 3.a – To add an IP address:
# neutron port-update b7d1d8bd-6ca7-4c35-9855-ba0dc2573fdc --allowed_address_pairs list=true type=dict ip_address=10.101.11.5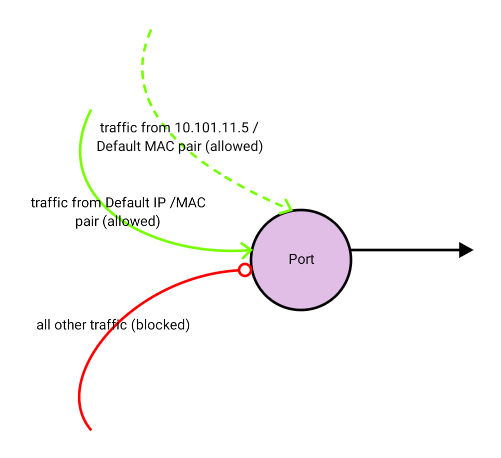
Step 3.b – To add multiple IP addresses and an additional MAC address:
# neutron port-update b7d1d8bd-6ca7-4c35-9855-ba0dc2573fdc --allowed_address_pairs list=true type=dict mac_address=ce:9e:5d:ad:6d:80,ip_address=10.101.11.5 ip_address=10.101.11.6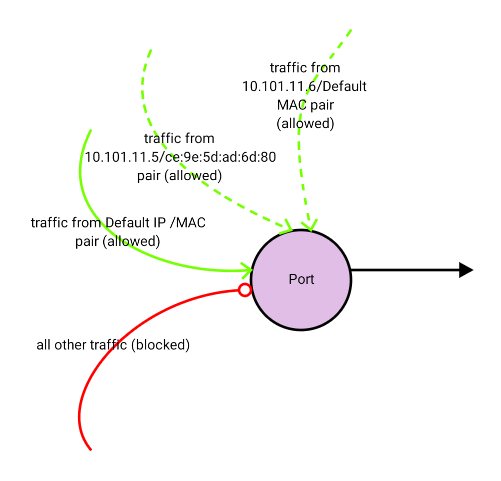
Step 3.c – To add an IP subnet:
# neutron port-update b7d1d8bd-6ca7-4c35-9855-ba0dc2573fdc --allowed_address_pairs list=true type=dict ip_address=10.101.11.0/24
Note: If you do not provide the MAC address, Neutron defaults to the MAC address of the port known to OpenStack. This means that you cannot provide an IP / range of IP(s) without a MAC address. This is effective when you want to add more than one IP address on the same virtual machine instance. However this will not work if you want to create a virtual machine to allow traffic to pass through, for example a virtual machine representing a router or a firewall.
Disabling port security
In certain situations, you might need to allow traffic to pass through the virtual machine instance in OpenStack. For example, if this virtual machine represents a networking device, like a router or a firewall. In this situation, it is not possible to provide all the possible IP / MAC address combinations in “allowed_address_pairs” to cover all the possible machines that might send traffic via this networking instance. A better option in this case is to disable the port level security. Before disabling the port level security please note the following:
- Port level security cannot be disabled if:
- A security group is assigned to the instance
- Allowed address pairs are set for the instance
- Once port level security is disabled, all traffic (Ingress and Egress) will be allowed on this interface.
- Make sure that the security is being managed by the virtual machine instance (e.g. firewall rules) to compensate for the disabled security at the OpenStack level.
As seen above you will need to remove any existing security groups from the instance. This can be easily done from the Horizon GUI. I will not dwell into the details of how to do this, since it’s very rudimentary.
Also you will need to disable the allowed address pairs. As of date I was unable to find the OpenStack command-line option to set the allowed address pairs to blank once it has been set. In order to do this we use the OpenStack API.
Use the following command to get an authentication token from keystone in order to access the OpenStack API:
# curl -d '{"auth":{"passwordCredentials":{"username": "admin","password": "pass"},"tenantName": "tenant1"}}' -H "Content-Type: application/json" http://10.10.1.10:5000/v2.0/tokens
Note that we need to provide the username and password for a valid OpenStack user that has access to the given tenant (tenant1 above) and also note the IP address ’10.10.1.10’ which represents the server where keystone resides. The output for this command will be as follows:
{"access": {"token": {"issued_at": "2016-06-05T01:49:36.477765", "expires": "2016-06-05T02:49:36Z", "id": "f3e704d837cf4074a0eb965d9de58c40", "tenant": {"description": "RDP Service UAT (TNT11_CL1)", "enabled": true, "id": "4dedb7b7ffe740c181d35a930809b22b", "name": "rdp_srv_uat"}, "audit_ids": ["H5JfGB-6QISRBlWObwAyRg"]}, "serviceCatalog": [{"endpoints": [{"adminURL": "http://10.10.1.10:8774/v2/4dedb7b7ffe740c181d35a930809b22b", "region": "RegionOne", "internalURL": "http://10.10.1.10:8774/v2/4dedb7b7ffe740c181d35a930809b22b", "id": "78655fc75ce2432986e1469c0703d32c", "publicURL": ….
I have trimmed the above output for readability. The only item of interest for us is the session token ID (4dedb7b7ffe740c181d35a930809b22b). We will use this in the next command:
# curl -i http://10.10.1.11:9696/v2.0/ports/ccbd0ed6-3dfd-4431-af29-4a2d921abb38.json -X PUT -H "X-Auth-Token: 4dedb7b7ffe740c181d35a930809b22b" -H "Content-Type: application/json" -H "Accept: application/json" -H "User-Agent: python-neutronclient" -d '{"port": {"allowed_address_pairs": []}}'
The Token (4dedb7b7ffe740c181d35a930809b22b) is the same token we obtained from the previous command. The ID of the port for which we need to set “allowed_address_pairs” to “blank” is also listed above (ccbd0ed6-3dfd-4431-af29-4a2d921abb38). The last section of the command (“’port’: {‘allowed_address_pairs’: []}”) sets the allowed address pairs to “blank”.
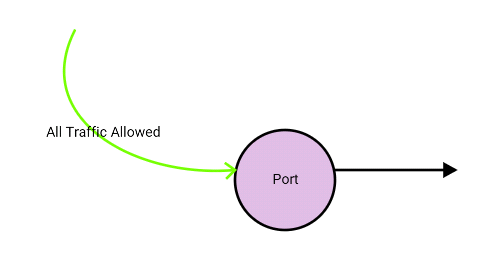
Now that we have removed the security group and set allowed address pairs to blank we can disable the port level security. Run the following command to achieve this:
# neutron port-update ccbd0ed6-3dfd-4431-af29-4a2d921abb38 --port_security_enabled=False
The above command will disable port security on the particular port and allow all traffic to pass through without neutron dropping it as depicted below.
Thank you for reading. If you have any questions/comments please feel free to share below in the comments section so everyone from different sources can benefit from the discussion.
This post first appeared on the WhatCloud blog. Superuser is always interested in community content, email: editor@superuser.org.
Cover Photo // CC BY NC
The post Managing port level security in OpenStack appeared first on OpenStack Superuser.
Powered by WPeMatico