Author: Alexandru Coman
Source: Planet OpenStack
More and more people are interested in cloud computing and OpenStack but many of them give it up because they can’t test or interact with this kind of infrastructure. This is mostly a result of either high costs of hardware or the difficulty of the deployment in a particular environment.
In order to help the community to interact more with cloud computing and learn about it, Cloudbase Solutions has come up with a simple VirtualBox driver for OpenStack. VirtualBox allows you to set up a cloud environment on your personal laptop, no matter which operating system you’re using (Windows, Linux, OS X). It also gets the job done with a free and familiar virtualization environment.
Nova hypervisor Support Matrix
| Feature | Status | VirtualBox |
|---|---|---|
| Attach block volume to instance | optional | Partially supported |
| Detach block volume from instance | optional | Partially supported |
| Evacuate instances from host | optional | Not supported |
| Guest instance status | mandatory | Supported |
| Guest host status | optional | Supported |
| Live migrate instance across hosts | optional | Not supported |
| Launch instance | mandatory | Supported |
| Stop instance CPUs | optional | Supported |
| Reboot instance | optional | Supported |
| Rescue instance | optional | Not supported |
| Resize instance | optional | Supported |
| Restore instance | optional | Supported |
| Service control | optional | Not supported |
| Set instance admin password | optional | Not supported |
| Save snapshot of instance disk | optional | Supported |
| Suspend instance | optional | Supported |
| Swap block volumes | optional | Not supported |
| Shutdown instance | mandatory | Supported |
| Resume instance CPUs | optional | Supported |
| Auto configure disk | optional | Not supported |
| Instance disk I/O limits | optional | Not supported |
| Config drive support | choice | Not supported |
| Inject files into disk image | optional | Not supported |
| Inject guest networking config | optional | Not supported |
| Remote desktop over RDP | choice | Supported |
| View serial console logs | choice | Not supported |
| Remote desktop over SPICE | choice | Not supported |
| Remote desktop over VNC | choice | Supported |
| Block storage support | optional | Supported |
| Block storage over fibre channel | optional | Not supported |
| Block storage over iSCSI | condition | Supported |
| CHAP authentication for iSCSI | optional | Supported |
| Image storage support | mandatory | Supported |
| Network firewall rules | optional | Not supported |
| Network routing | optional | Not supported |
| Network security groups | optional | Not supported |
| Flat networking | choice | Supported |
| VLAN networking | choice | Not supported |
More information regarding this feature can be found on the following pages: Nova Support Matrix and Hypervisor Support Matrix.
VirtualBox supported features
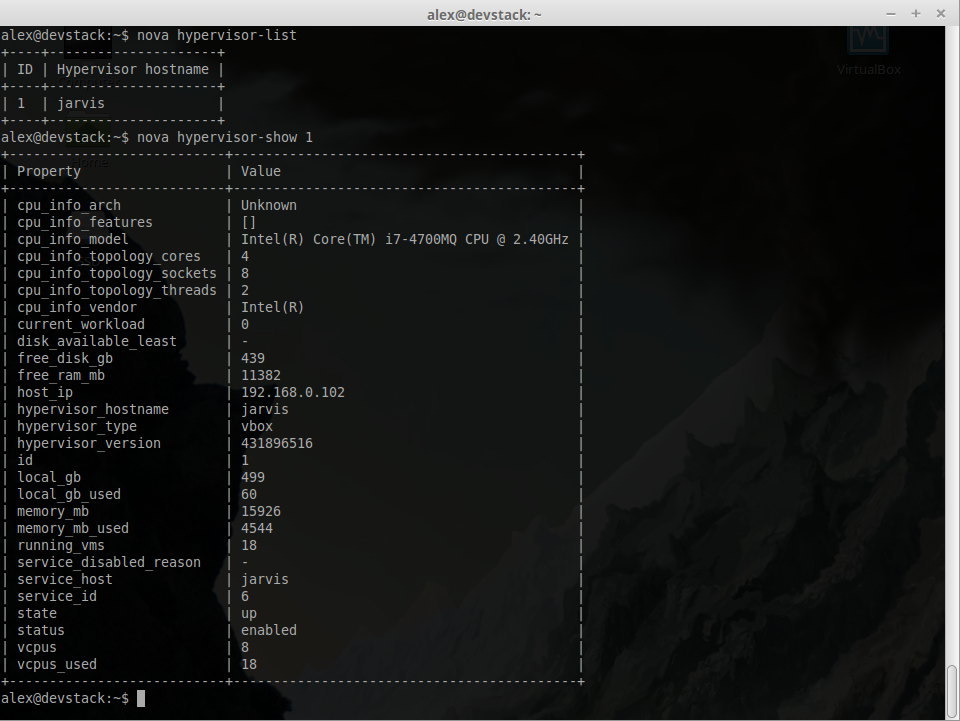
Guest instance status
Provides a quick report on information about the guest instance, including the power state, memory allocation, CPU allocation, number of vCPUs and cumulative CPU execution time.
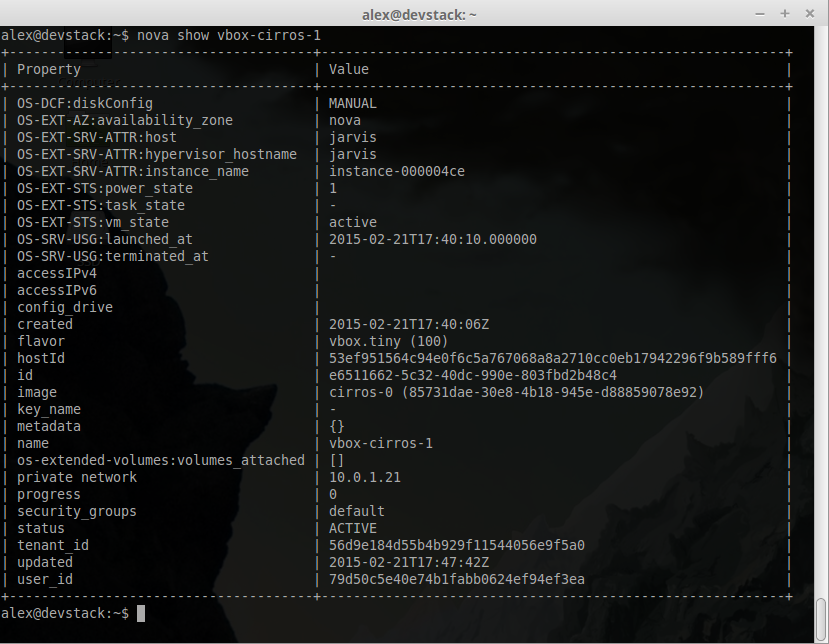
Guest host status
Provides a quick report of available resources on the host machine.
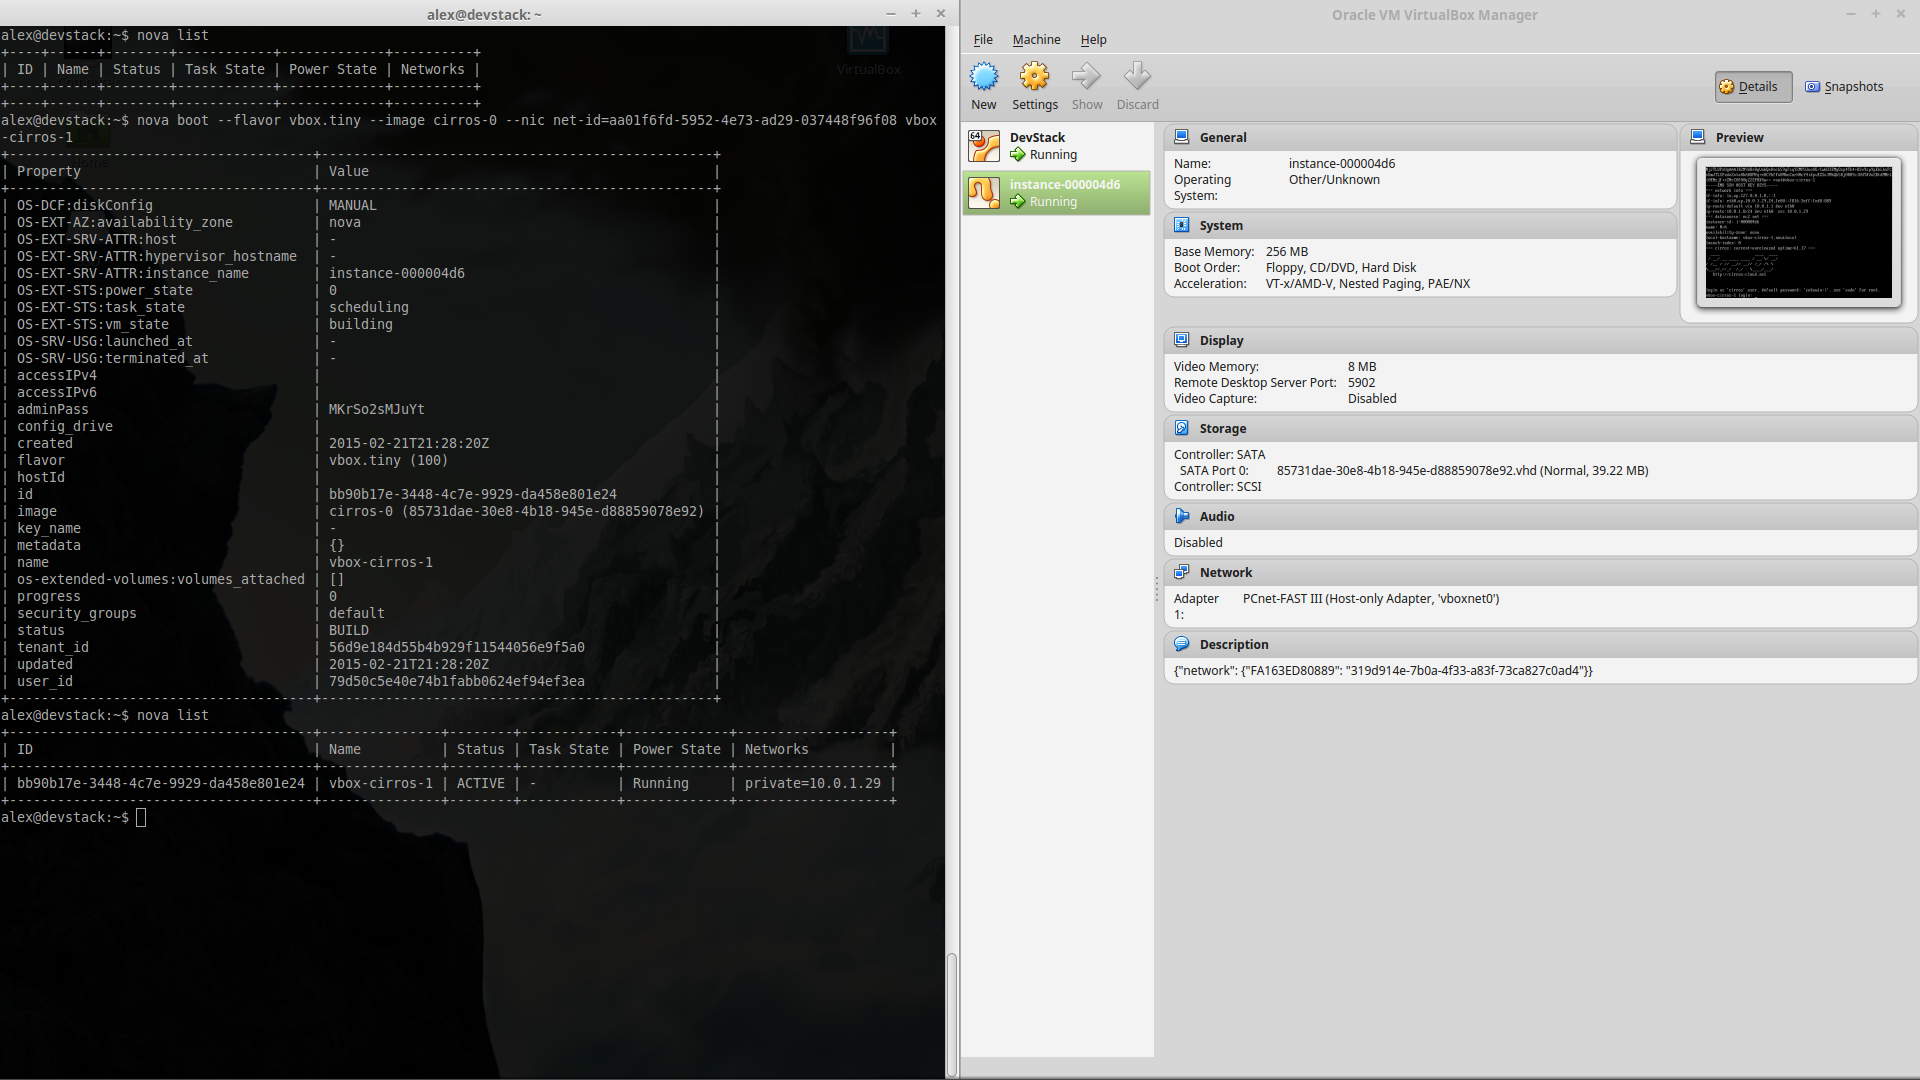
Launch instance
Creates a new instance (virtual machine) on the virtualization platform.
Shutdown instance

Stop instance CPUs
Stopping an instance CPUs can be thought of as roughly equivalent to suspend-to-RAM. The instance is still present in memory, but execution has stopped.
Resume instance CPUs
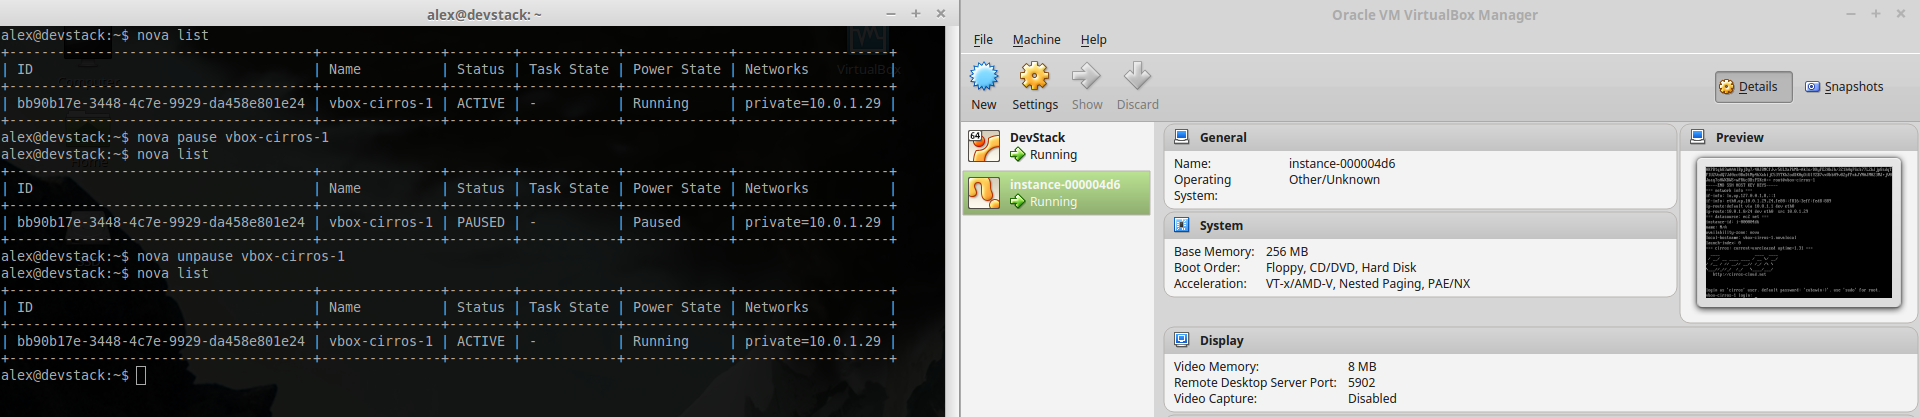
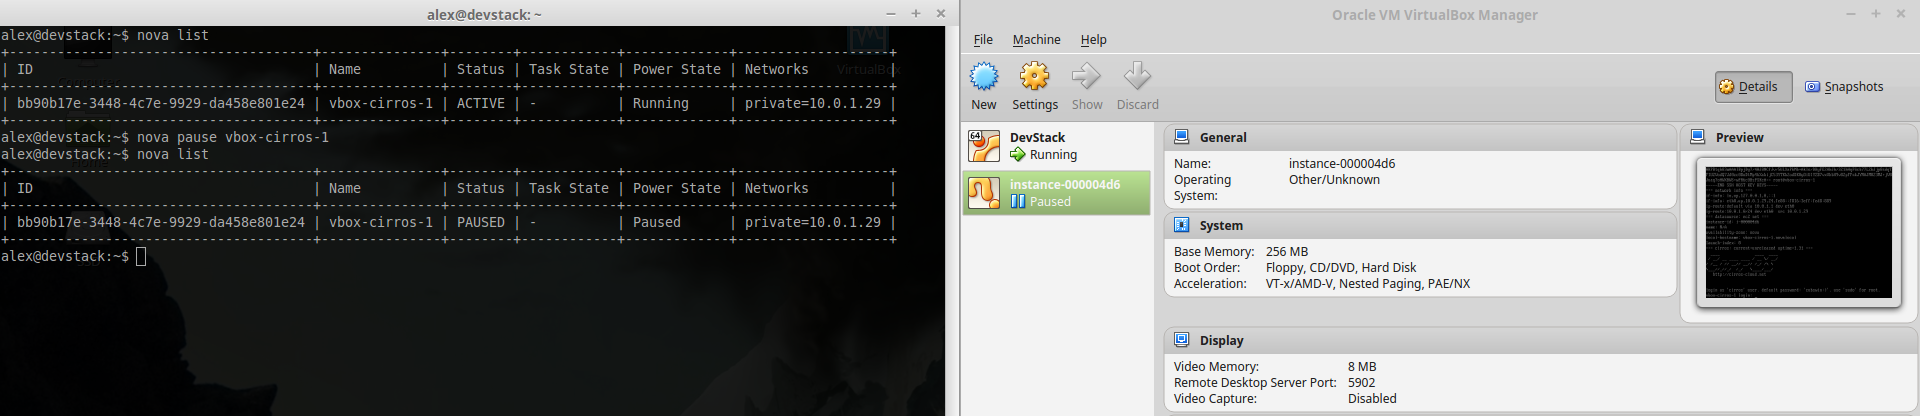
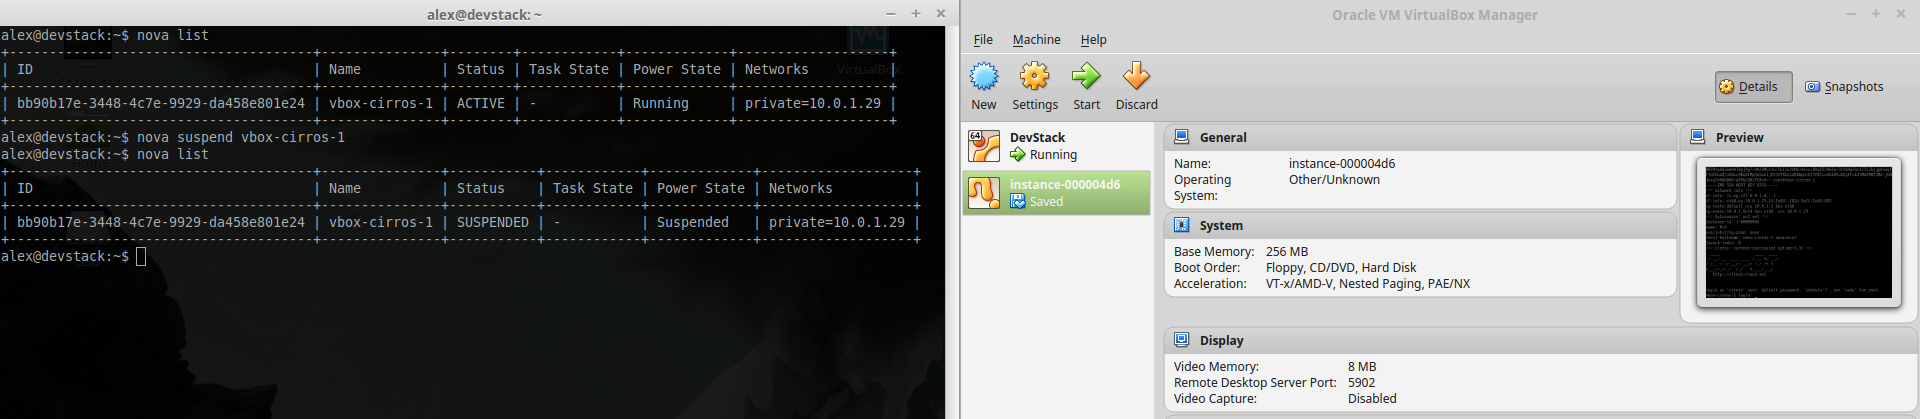
Suspend instance
Suspending an instance can be thought of as roughly equivalent to suspend-to-disk. The instance no longer consumes any RAM or CPUs, having its live running state preserved in a file on disk. It can later be restored, at which point it should continue execution where it left off.
Save snapshot of instance disk
The snapshot operation allows the current state of the instance root disk to be saved and uploaded back into the glance image repository. The instance can later be booted again using this saved image.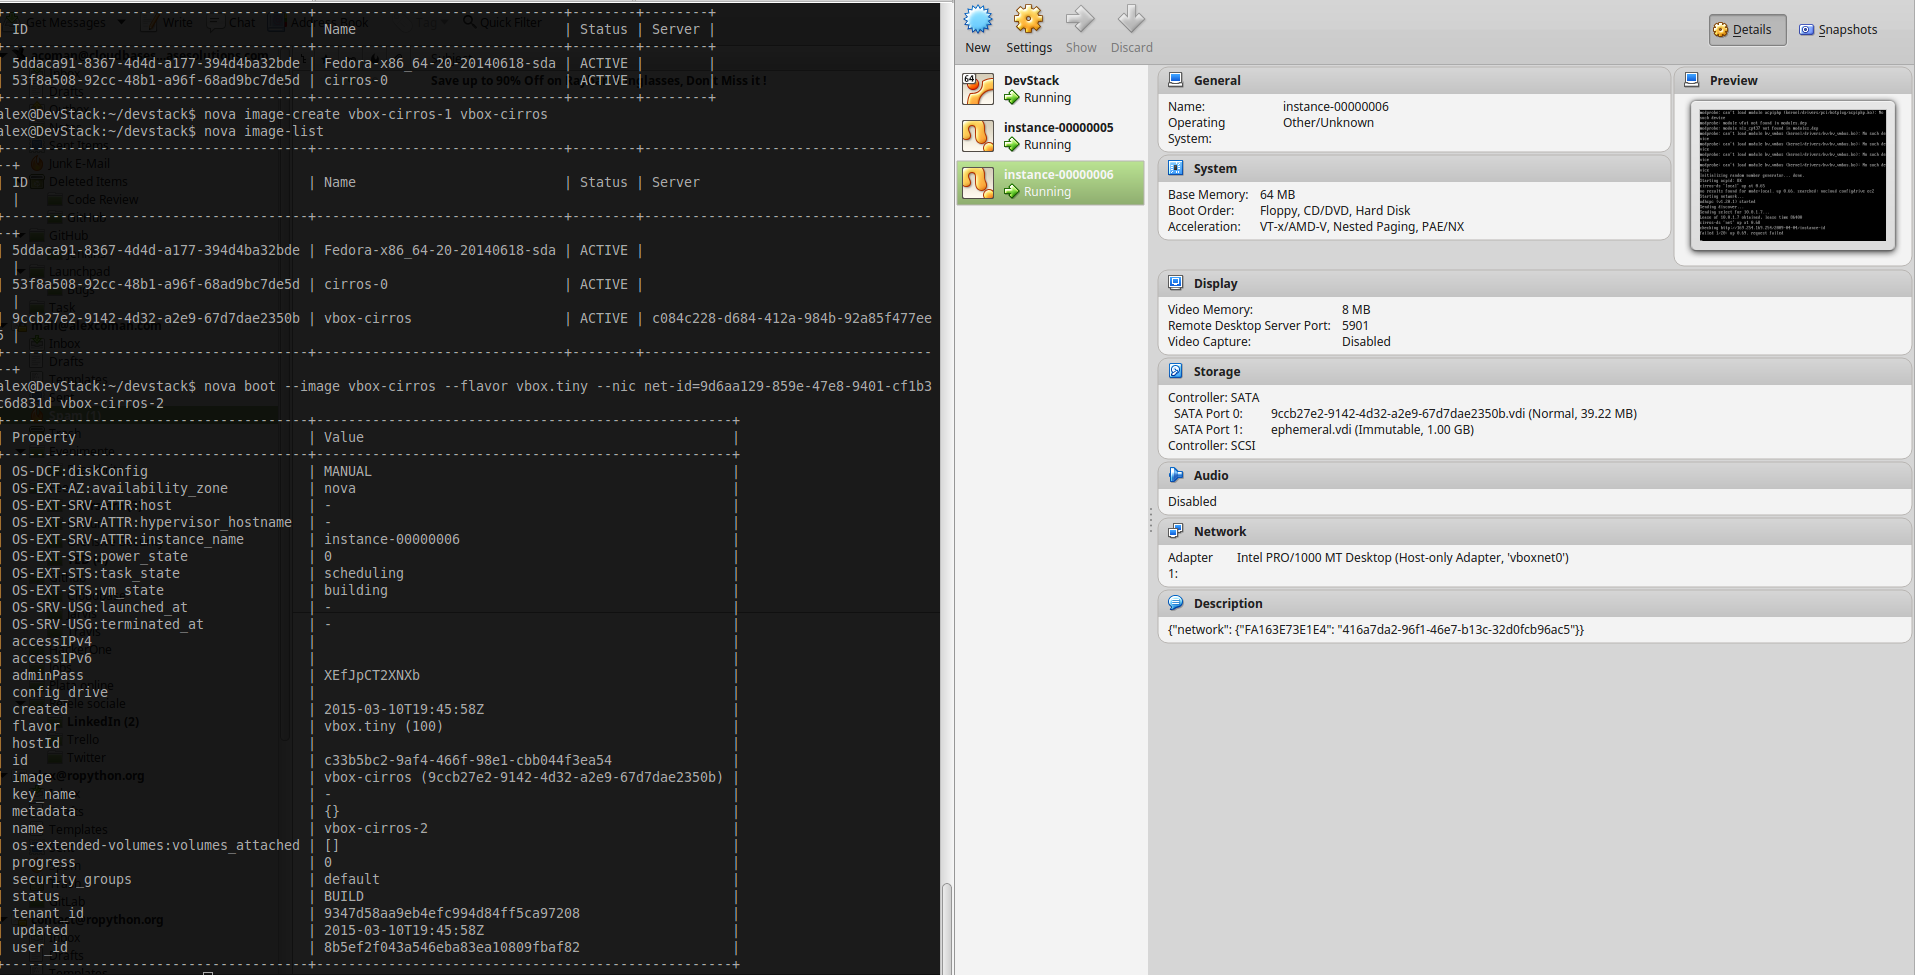
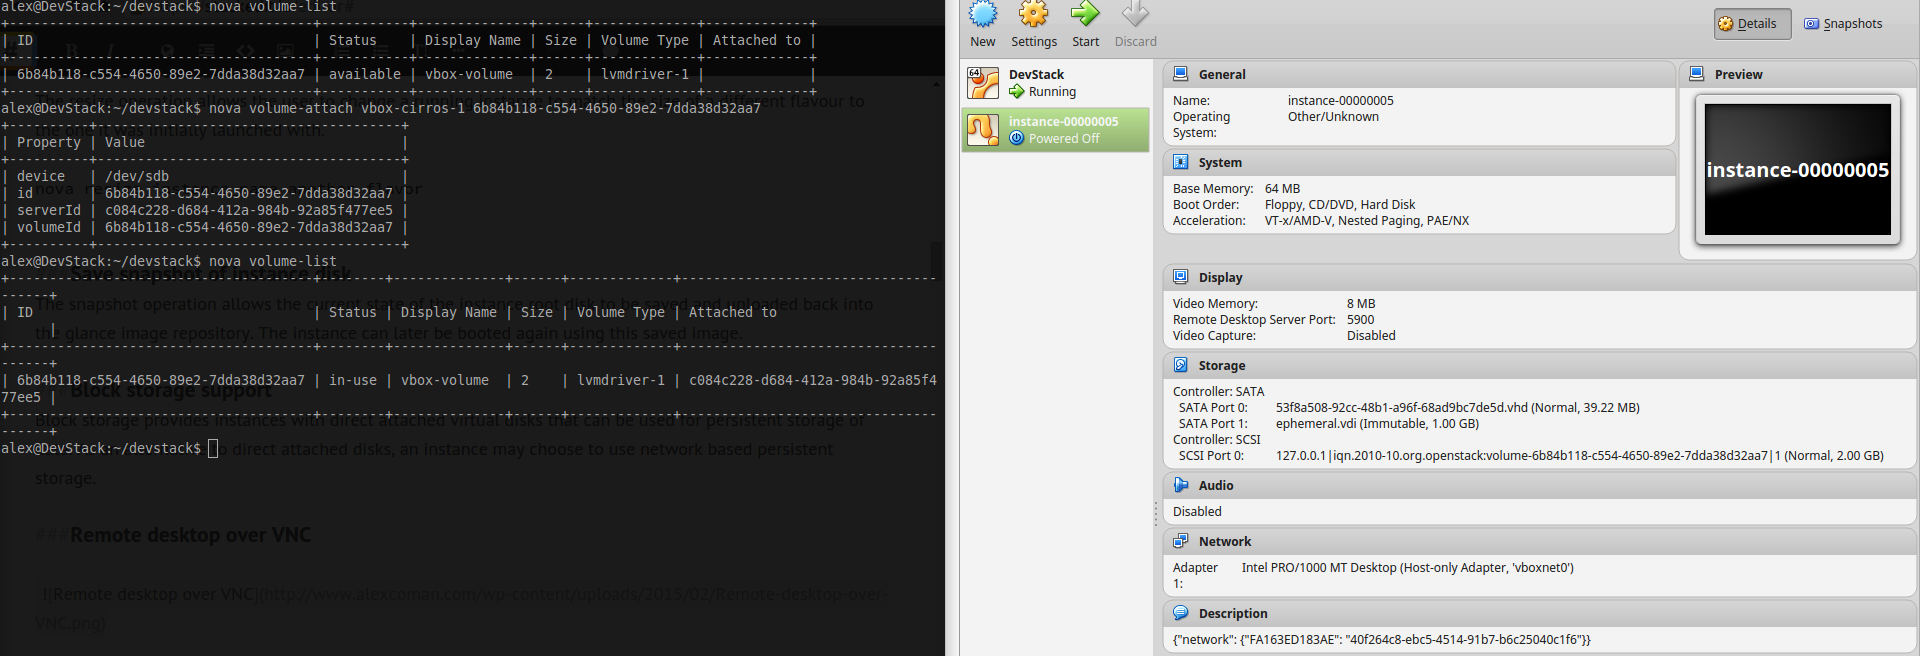
Block storage support
Block storage provides instances with direct attached virtual disks that can be used for persistent storage of data. As an alternative to direct attached disks, an instance may choose to use network based persistent storage.
Remote desktop over VNC
Note: In order to use this feature, the VNC extension pack for VirtualBox must be installed.
You can list all of the available extension packages running the following command:
VBoxManage list extpacks
Pack no. 0: Oracle VM VirtualBox Extension Pack
 Version: 4.3.20
 Revision: 96996
 Edition:
 Description: USB 2.0 Host Controller, Host Webcam, VirtualBox RDP, PXE ROM with E1000 support.
 VRDE Module: VBoxVRDP
 Usable: true
 Why unusable:

 Pack no. 1: VNC
 Version: 4.3.18
 Revision: 96516
 Edition:
 Description: VNC plugin module
 VRDE Module: VBoxVNC
 Usable: true
 Why unusable:
Setting up DevStack environment
Create Virtual Machine
- Processors:
- Number of processors: 2
- Number of cores per processor 1
- Memory: 4GB RAM (Recommended)
- HDD – SATA – 20 GB Preallocated
- Network:
- Network Adapter 1: NAT
- Network Adapter 2: Host Only
- Network Adapter 3: Nat
- Operating system – Ubuntu Server 14.04 (Recommended)
Update System
$ sudo apt-get update
$ sudo apt-get upgrade
Install openssh-server, git, vim, openvswitch-switch
$ sudo apt-get install -y git vim openssh-server openvswitch-switch
Edit network Interfaces
Here’s an example for a configuration. You’re free to use your own settings.
# This file describes the network interfaces available on your system
# and how to activate them. For more information, see interfaces(5).

# The loopback network interface
auto lo
iface lo inet loopback

# The primary network interface
auto eth0
iface eth0 inet dhcp

# The management interface
auto eth1
iface eth1 inet manual
up ip link set eth1 up
up ip link set eth1 promisc on
down ip link set eth1 promisc off
down ip link set eth1 down

# The public interface
auto eth2
iface eth2 inet manual
up ip link set eth2 up
down ip link set eth2 down
Clone devstack
$ cd
$ git clone https://github.com/openstack-dev/devstack.git
$ cd devstack
Change local.conf
$ sudo vim ~/devstack/local.conf
Here we have a template config file. You can also use your own settings.
[[local|localrc]]
HOST_IP=10.0.2.15
DEVSTACK_BRANCH=master
DEVSTACK_PASSWORD=Passw0rd

#Services to be started
enable_service rabbit
enable_service mysql

enable_service key

enable_service n-api
enable_service n-crt
enable_service n-obj
enable_service n-cond
enable_service n-sch
enable_service n-cauth
enable_service n-novnc
# Do not use Nova-Network
disable_service n-net

enable_service neutron
enable_service q-svc
enable_service q-agt
enable_service q-dhcp
enable_service q-l3
enable_service q-meta
enable_service q-lbaas
enable_service q-fwaas
enable_service q-metering
enable_service q-vpn

disable_service horizon

enable_service g-api
enable_service g-reg

enable_service cinder
enable_service c-api
enable_service c-vol
enable_service c-sch
enable_service c-bak

disable_service s-proxy
disable_service s-object
disable_service s-container
disable_service s-account

enable_service heat
enable_service h-api
enable_service h-api-cfn
enable_service h-api-cw
enable_service h-eng

disable_service ceilometer-acentral
disable_service ceilometer-collector
disable_service ceilometer-api

enable_service tempest

# To add a local compute node, enable the following services
disable_service n-cpu
disable_service ceilometer-acompute

IMAGE_URLS+=",https://raw.githubusercontent.com/cloudbase/ci-overcloud-init-scripts/master/scripts/devstack_vm/cirros-0.3.3-x86_64.vhd.gz"
HEAT_CFN_IMAGE_URL="https://www.cloudbase.it/downloads/Fedora-x86_64-20-20140618-sda.vhd.gz"

Q_PLUGIN=ml2
Q_ML2_PLUGIN_MECHANISM_DRIVERS=openvswitch
Q_ML2_TENANT_NETWORK_TYPE=vlan

PHYSICAL_NETWORK=physnet1
OVS_PHYSICAL_BRIDGE=br-eth1
OVS_BRIDGE_MAPPINGS=physnet1:br-eth1

OVS_ENABLE_TUNNELING=False
ENABLE_TENANT_VLANS=True
TENANT_VLAN_RANGE=500:2000

GUEST_INTERFACE_DEFAULT=eth1
PUBLIC_INTERFACE_DEFAULT=eth2

CINDER_SECURE_DELETE=False
VOLUME_BACKING_FILE_SIZE=50000M

LIVE_MIGRATION_AVAILABLE=False
USE_BLOCK_MIGRATION_FOR_LIVE_MIGRATION=False

LIBVIRT_TYPE=kvm
API_RATE_LIMIT=False

DATABASE_PASSWORD=$DEVSTACK_PASSWORD
RABBIT_PASSWORD=$DEVSTACK_PASSWORD
SERVICE_TOKEN=$DEVSTACK_PASSWORD
SERVICE_PASSWORD=$DEVSTACK_PASSWORD
ADMIN_PASSWORD=$DEVSTACK_PASSWORD

SCREEN_LOGDIR=/opt/stack/logs/screen
VERBOSE=True
LOG_COLOR=False

SWIFT_REPLICAS=1
SWIFT_HASH=66a3d6b56c1f479c8b4e70ab5d2014f6

KEYSTONE_BRANCH=$DEVSTACK_BRANCH
NOVA_BRANCH=$DEVSTACK_BRANCH
NEUTRON_BRANCH=$DEVSTACK_BRANCH
SWIFT_BRANCH=$DEVSTACK_BRANCH
GLANCE_BRANCH=$DEVSTACK_BRANCH
CINDER_BRANCH=$DEVSTACK_BRANCH
HEAT_BRANCH=$DEVSTACK_BRANCH
TROVE_BRANCH=$DEVSTACK_BRANCH
HORIZON_BRANCH=$DEVSTACK_BRANCH
TROVE_BRANCH=$DEVSTACK_BRANCH
REQUIREMENTS_BRANCH=$DEVSTACK_BRANCH
More information regarding local.conf can be found on Devstack configuration.
Edit ~/.bashrc
$ vim ~/.bashrc
Add this lines at the end of file.
export OS_USERNAME=admin
export OS_PASSWORD=Passw0rd
export OS_TENANT_NAME=admin
export OS_AUTH_URL=http://127.0.0.1:5000/v2.0
Disable Firewall
$ sudo ufw disable
Run stack.sh
$ cd ~/devstack
$ ./stack.sh
IMPORTANT: If the scripts don’t end properly or something else goes wrong, please unstack first using ./unstack.sh script.
Setup networks
# Remove the current network configuration

# Remove the private subnet from the router
neutron router-interface-delete router1 private-subnet
# Remove the public network from the router
neutron router-gateway-clear router1
# Delete the router
neutron router-delete router1
# Delete the private network
neutron net-delete private
# Delete the public network
neutron net-delete public

# Setup the network

# Create the private network
NETID1=$(neutron net-create private --provider:network_type flat --provider:physical_network physnet1 | awk '{if (NR == 6) {print $4}}');
echo "[i] Private network id: $NETID1";
# Creathe the private subnetwork
SUBNETID1=$(neutron subnet-create private 10.0.1.0/24 --dns_nameservers list=true 8.8.8.8 | awk '{if (NR == 11) {print $4}}');
# Create the router
ROUTERID1=$(neutron router-create router | awk '{if (NR == 9) {print $4}}');
# Attach the private subnetwork to the router
neutron router-interface-add $ROUTERID1 $SUBNETID1
# Create the public network
EXTNETID1=$(neutron net-create public --router:external | awk '{if (NR == 6) {print $4}}');
# Create the public subnetwork
neutron subnet-create public --allocation-pool start=10.0.2.100,end=10.0.2.120 --gateway 10.0.2.1 10.0.2.0/24 --disable-dhcp
# Attach the public network to the router
neutron router-gateway-set $ROUTERID1 $EXTNETID1

# Security Groups

# Enable ping
nova secgroup-add-rule default ICMP 8 8 0.0.0.0/0
# Enable SSH
nova secgroup-add-rule default tcp 22 22 0.0.0.0/0
# Enable RDP
nova secgroup-add-rule default tcp 3389 3389 0.0.0.0/0
Change current version of nova and neutron
For the moment the *Nova Driver* and *Neutron Agent* for *VirtualBox* are not included in the current version of OpenStack. In order to use them we must change the version of *nova* and *neutron* installed by DevStack.
- Change the nova version used:
$ cd /opt/stack/nova
$ git remote add vbox https://github.com/cloudbase/nova-virtualbox.git
$ git fetch vbox
$ git checkout -t vbox/virtualbox_driver
$ sudo python setup.py install
- Change the neutron version used:
$ cd /opt/stack/neutron
$ git remote add vbox https://github.com/cloudbase/neutron-virtualbox.git
$ git fetch vbox
$ git checkout -t vbox/virtualbox_agent
$ sudo python setup.py install
- Change mechanism drivers:
$ cd /etc/neutron/plugins/ml2
$ vim ml2_conf.ini
- Add vbox in the following line:
mechanism_drivers = openvswitch,vbox
Port forwarding
In order to access the services provided by the virtual host with DevStack from within the host machine you have to forward the ports towards said host.
For each used port we need to run one of the following commands:
# If the virtual machine is in power off state.
$ VBoxManage --modifyvm DevStack [--natpf<1-N> [<rulename>],tcp|udp,[<hostip>],
                                 <hostport>,[<guestip>],<guestport>]

# If the virtual machine is running
$ VBoxManage --controlvm DevStack natpf<1-N> [<rulename>],tcp|udp,[<hostip>],
                                             <hostport>,[<guestip>],<guestport> |
For example the required rules for a compute node can be the following:
# Message Broker (AMQP traffic) - 5672
$ VBoxManage controlvm DevStack natpf1 "Message Broker (AMQP traffic), tcp, 127.0.0.1, 5672, 10.0.2.15, 5672"

# iSCSI target - 3260
$ VBoxManage controlvm DevStack natpf1 "iSCSI target, tcp, 127.0.0.1, 3260, 10.0.2.15, 3260"

# Block Storage (cinder) - 8776
$ VBoxManage controlvm DevStack natpf1 "Block Storage (cinder), tcp, 127.0.0.1, 8776, 10.0.2.15, 8776"

# Networking (neutron) - 9696
$ VBoxManage controlvm DevStack natpf1 "Networking (neutron), tcp, 127.0.0.1, 9696, 10.0.2.15, 9696"

# Identity service (keystone) - 35357 or 5000
$ VBoxManage controlvm DevStack natpf1 "Identity service (keystone) administrative endpoint, tcp, 127.0.0.1, 35357, 10.0.2.15, 35357"

# Image Service (glance) API - 9292
$ VBoxManage controlvm DevStack natpf1 "Image Service (glance) API, tcp, 127.0.0.1, 9292, 10.0.2.15, 9292"

# Image Service registry - 9191
$ VBoxManage controlvm DevStack natpf1 "Image Service registry, tcp, 127.0.0.1, 9191, 10.0.2.15, 9191"

# HTTP - 80
$ VBoxManage controlvm DevStack natpf1 "HTTP, tcp, 127.0.0.1, 80, 10.0.2.15, 80"

# HTTP alternate
$ VBoxManage controlvm DevStack natpf1 "HTTP alternate, tcp, 127.0.0.1, 8080, 10.0.2.15, 8080"

# HTTPS - 443
$ VBoxManage controlvm DevStack natpf1 "HTTPS, tcp, 127.0.0.1, 443, 10.0.2.15, 443"
More information regarding Openstack default ports can be found on Appendix A. Firewalls and default ports.
Setting up nova-compute
Clone nova
$ cd
$ git clone -b virtualbox_driver https://github.com/cloudbase/nova-virtualbox.git
Install nova & requirements
$ cd nova
$ pip install -r requirements.txt
$ python setup.py install
Configuration
VirtualBox Nova Driver have the following custom config options:
| Group | Config option | Default value | Short description |
|---|---|---|---|
| [virtualbox] | remote_display | False | Enable or disable the VRDE Server. |
| [virtualbox] | retry_count | 3 | The number of times to retry to execute command. |
| [virtualbox] | retry_interval | 1 | Interval between execute attempts, in seconds. |
| [virtualbox] | vboxmanage_cmd | VBoxManage | Path of VBoxManage. |
| [virtualbox] | vrde_unique_port | False | Whether to use an unique port for each instance. |
| [virtualbox] | vrde_module | Oracle VM VirtualBox Extension Pack | The module used by VRDE Server. |
| [virtualbox] | vrde_port | 3389 | A port or a range of ports the VRDE server can bind to. |
| [virtualbox] | vrde_require_instance_uuid_as_password | False | Use the instance uuid as password for the VRDE server. |
| [virtualbox] | vrde_password_length | None | VRDE maximum length for password. |
| [virtualbox] | wait_soft_reboot_seconds | 60 | Number of seconds to wait for instance to shut down after soft reboot request is made. |
| [rdp] | encrypted_rdp | False | Enable or disable the rdp encryption. |
| [rdp] | security_method | RDP | The security method used for encryption. (RDP, TLS, Negotiate). |
| [rdp] | server_certificate | None | The Server Certificate. |
| [rdp] | server_private_key | None | The Server Private Key. |
| [rdp] | server_ca | None | The Certificate Authority (CA) Certificate. |
The following config file is an example of nova_compute.conf. You can use your own settings.
[DEFAULT]
verbose=true
debug=true
use_cow_images=True
allow_resize_to_same_host=true
vnc_enabled=True
vncserver_listen = 127.0.0.1
vncserver_proxyclient_address = 127.0.0.1
novncproxy_base_url=http://127.0.0.1:6080/vnc_auto.html
# [...]

[cinder]
endpoint_template=http://127.0.0.1:8776/v2/%(project_id)s

[virtualbox]
#On Windows
#vboxmanage_cmd=C:Program FilesOracleVirtualBoxVBoxManage.exe
remote_display = true
vrde_module = VNC
vrde_port = 5900-6000
vrde_unique_port = true
vrde_password_length=20
vrde_require_instance_uuid_as_password=True
[rdp]

#encrypted_rdp=true
#security_method=RDP
#server_certificate=server_cert.pem
#server_private_key=server_key_private.pem
#server_ca=ca_cert.pem
#html5_proxy_base_url=http://127.0.0.1:8000/
More information regarding compute node configuration can be find on the following pages: List of compute config options and Nova compute.
Start up nova-compute
$ nova-compute --config-file nova_compute.conf
Setting up the VirtualBox Neutron Agent
Clone neutron
$ cd
$ git clone -b virtualbox_agent https://github.com/cloudbase/neutron-virtualbox.git
Install neutron & requirements
$ cd neutron
$ pip install -r requirements.txt
$ python setup.py install
Create neutron-agent.conf
VirtualBox Neutron Agent have the following custom config options:
| Group | Config option | Default value | Short description |
|---|---|---|---|
| [virtualbox] | retry_count | 3 | The number of times to retry to execute command. |
| [virtualbox] | retry_interval | 1 | Interval between execute attempts, in seconds. |
| [virtualbox] | vboxmanage_cmd | VBoxManage | Path of VBoxManage. |
| [virtualbox] | nic_type | 82540EM | The network hardware which VirtualBox presents to the guest. |
| [virtualbox] | use_local_network | False | Use host-only network instead of bridge. |
Here is a config file as an example for neutron_agent.conf. Feel free to use your own settings.
[DEFAULT]
debug=True
verbose=True
control_exchange=neutron
policy_file=$PATH/policy.json
rpc_backend=neutron.openstack.common.rpc.impl_kombu
rabbit_host=127.0.0.1
rabbit_port=5672
rabbit_userid=stackrabbit
rabbit_password=Passw0rd
logdir=$LOG_DIR
logfile=neutron-vbox-agent.log

[AGENT]
polling_interval=2
physical_network_mappings=*:vboxnet0

[virtualbox]
use_local_network=True
Start up the VirtualBox agent
$ neutron-vbox-agent --config-file neutron_agent.conf
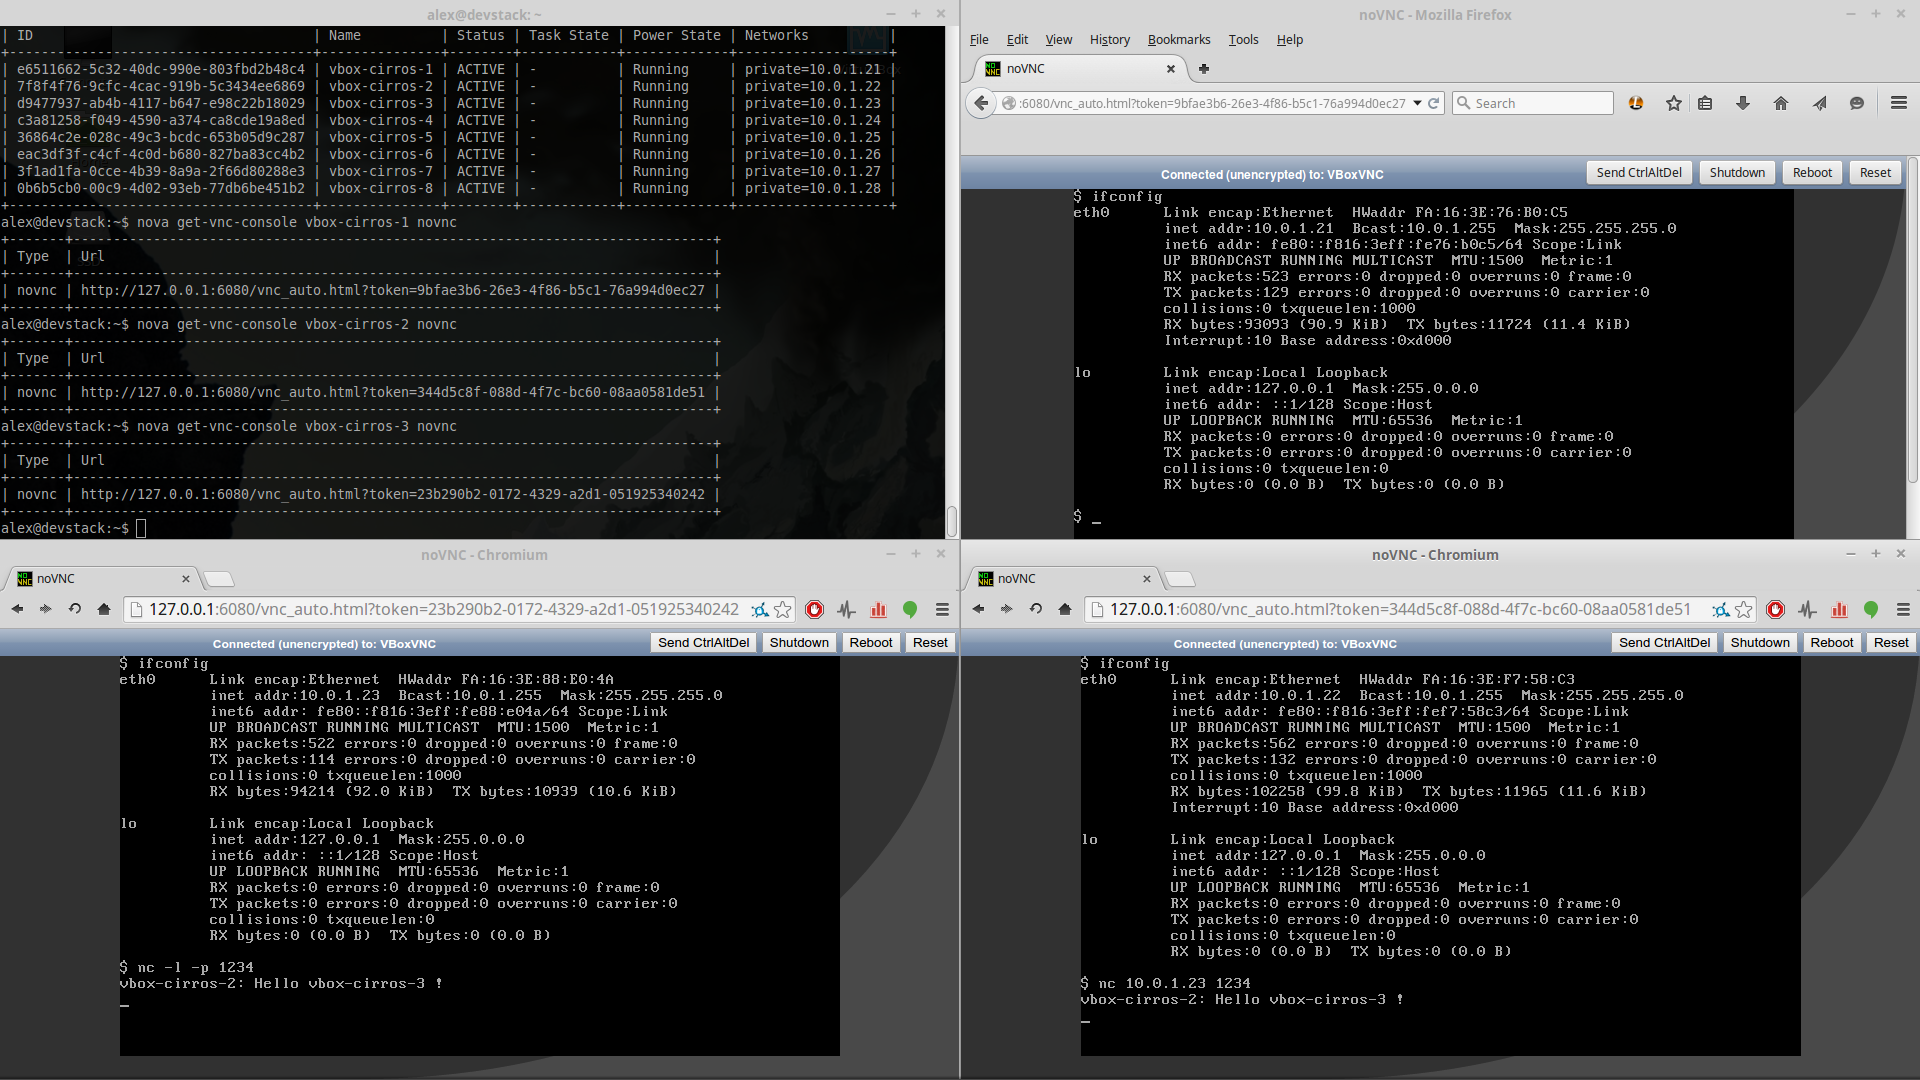
Proof of concept
[youtube http://www.youtube.com/watch?v=4Fod6M6fGJw?feature=oembed]The post VirtualBox driver for OpenStack appeared first on Cloudbase Solutions.
Powered by WPeMatico